
How to replace control arm bushings?
Clunking noises over bumps and vague steering are not just annoyances; they are critical warning signs of suspension failure. For aftermarket distributors and workshop owners, understanding the root cause—often a failed control arm bushing—is essential for reducing warranty claims and ensuring vehicle safety. This guide covers the replacement process and the manufacturing technologies that define a durable part.
To replace a control arm bushing, technicians must remove the control arm from the vehicle, press out the old bushing using a hydraulic press or specialized removal tool, and carefully press in the new bushing to the correct depth and orientation. Finally, the arm is reinstalled, and the suspension is loaded before torqueing the bolts to prevent pre-load stress.

Before we analyze the replacement procedure and the specific engineering advantages of premium bushings, we must first establish the technical anatomy of this critical suspension component.
What is a control arm bushing?
A control arm bushing is a flexible vibration isolator acting as a pivot point between the vehicle’s frame and the suspension control arm. It allows for controlled movement while suppressing noise and vibration.
Structurally, a control arm bushing consists of three key components: an inner metal sleeve (crush tube), an outer metal sleeve (shell), and a durable elastomeric layer—typically natural rubber—cured between them. This "sandwich" construction allows the suspension to articulate without metal-on-metal friction.

Dive Deeper: The Engineering Behind the "Sandwich"
At first glance, a bushing appears to be a simple rubber spacer, but from an engineering perspective, it is a sophisticated tuning device for the chassis. The core function relies on the elastomeric properties of the rubber, specifically its Shore Hardness A and Tensile Strength. The rubber is not merely stuffed between two metal tubes; it is permanently bonded to them (a process we will discuss later).
In a B2B context, it is crucial to understand that the bushing acts as a torsional spring. When the control arm moves up and down with the road surface, the rubber inside the bushing twists. It does not rotate like a bearing; it shears. This is why the material science behind the rubber is paramount. If the rubber formulation is too stiff, it transmits excessive road noise into the cabin, increasing NVH (Noise, Vibration, and Harshness). If it is too soft, it deflects too much under braking or cornering loads, causing the vehicle’s geometry to shift unpredictably.
Furthermore, the design often varies based on the load path. Some bushings are "hydro-bushings," containing hydraulic fluid to dampen specific frequencies, while most standard applications use solid rubber with carefully designed voids. These voids are not defects; they are calculated gaps that allow the rubber to deform more easily in one direction (compliance) while remaining stiff in another. For example, a bushing might need to be soft longitudinally to absorb impact harshness from potholes but stiff laterally to maintain toe angles during cornering. Understanding this anisotropic behavior helps distributors explain why "one size fits all" universal bushings often fail to restore the original ride quality.
The function of control arm bushings
The primary functions of control arm bushings1 are to maintain precise wheel alignment during dynamic driving maneuvers and to isolate the cabin from high-frequency road irregularities.
Control arm bushings serve as the "cartilage" of the suspension system. They cushion the impact from road bumps, preventing harsh vibrations from traveling through the chassis to the driver, while simultaneously holding the control arm firmly in position to ensure the tires maintain optimal contact with the road.

Dive Deeper: NVH Control and Safety Consequences
The strategic importance of the control arm bushing cannot be overstated when discussing NVH (Noise, Vibration, and Harshness). In modern automotive engineering, the chassis is a resonant structure. Without effective bushings, the energy from the road—ranging from low-frequency bumps to high-frequency tire hum—would transfer directly into the subframe and unibody. This results in a "booming" noise inside the cabin and palpable vibration in the steering wheel.
However, the function extends far beyond comfort. From a safety and mechanical standpoint, the bushing is a guardian of alignment geometry. When a driver hits the brakes, the momentum of the vehicle tries to push the wheels backward. A healthy bushing resists this force, keeping the caster angle stable. If the bushing2 is worn or torn, the control arm will shift significantly under braking load. This phenomenon is known as "dynamic alignment change."
The consequences of this dynamic shifting are severe. First, it causes uneven tire wear, typically manifesting as feathering or cupping on the tire edges, which is a direct cost to the vehicle owner. Second, it leads to "brake judder" or steering wander, where the car feels unstable during emergency stops.
For parts distributors, this is a key educational angle for your customers. A bushing is not just a noise damper; it is a geometry stabilizer. When a mechanic sees uneven tire wear, the control arm bushings should be the first suspect after checking tire pressure. Replacing a bushing restores the vehicle’s ability to hold its alignment, essentially "resetting" the handling characteristics to factory standards. Ignoring these symptoms can lead to a domino effect, placing additional stress on ball joints and tie rod ends, eventually leading to catastrophic suspension failure.
How to replace a control arm bushing?
Replacing a bushing requires overcoming the interference fit between the outer metal shell and the control arm housing, a task that demands significant force and precision.
The general process involves removing the wheel and control arm, then using a hydraulic press to force the old bushing out. The new bushing is then coated with a lubricant (if applicable) and pressed in, ensuring it aligns with factory markings to prevent pre-mature tearing.

Dive Deeper: The Mechanic’s Reality and Installation Risks
I recently watched a video by ChrisFix, one of the most respected automotive educators on YouTube, titled "How to Replace Control Arm Bushings (EASY)." In this demonstration, he walks through the process of removing the control arm and using a ball joint press tool to swap the bushings.
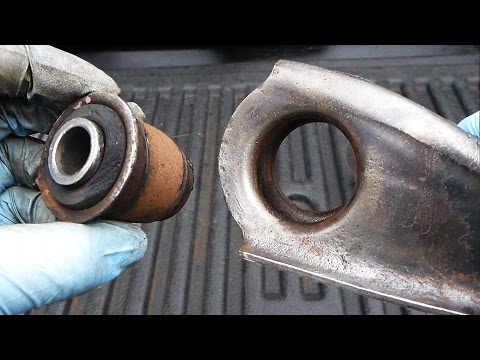
Watching this video highlights several critical realities that we, as manufacturers and suppliers, must address. First, the force required to remove an old, rusted bushing is immense. You can see the struggle even with proper tools. This underscores why the Outer Sleeve of the replacement bushing must be manufactured to exact tolerances. If the replacement part is even slightly oversized, it will gall the control arm housing during installation, ruining the arm. If it is undersized, it will walk out of the bore during driving.
The "Pre-load" Trap:
One specific technical nuance that is often missed in DIY scenarios—but is crucial for professional installation—is the concept of "clocking" or timing the bushing. As touched upon in professional guides, you cannot simply torque the control arm bolts while the car is hanging on a lift. If you tighten the bolts with the wheels dangling, the rubber is locked in a fully drooped position. When the car is lowered to the ground, the rubber twists to the neutral position. As soon as the driver hits a bump, the rubber twists further, exceeding its design limit and tearing instantly. This is the #1 cause of premature bushing failure, not manufacturing defects.
Sales Enablement:
For service advisors, explaining this complexity helps justify the labor cost. It is not just "unbolt and re-bolt." It involves rust management, high-tonnage pressing, and precise loading of the suspension. Furthermore, this emphasizes the need for high-quality parts. A cheap bushing with poor dimensional accuracy might crack during that high-pressure installation phase shown in the video, wasting hours of labor. GSW bushings are engineered to withstand these installation forces without deformation.
Advantages of control arm bushings
The difference between a premium bushing and a low-cost alternative often lies in the invisible manufacturing processes, specifically the bonding technology and rubber formulation.
High-quality control arm bushings utilize advanced rubber-to-metal bonding techniques to prevent separation under load. GSW bushings feature a specific phosphating treatment on the metal components, ensuring maximum adhesion, superior fatigue life, and long-term resistance to road salts and contaminants.

Dive Deeper: The Science of Phosphating and Bonding
At GSW Autoparts, we often encounter the question: "Why do some aftermarket bushings peel away from the metal sleeve after only a few months?" The answer usually lies in the Rubber-to-Metal Bonding process. This is the single most critical manufacturing step, and it is where GSW differentiates itself through Specific Phosphating Treatment.
In cheap manufacturing, the metal sleeve is simply cleaned and coated with adhesive. However, smooth metal offers a poor surface for chemical bonding. Under the immense shear loads of braking and cornering, the adhesive layer shears off, causing the rubber to detach (de-bonding). Once de-bonding occurs, the bushing loses all structural integrity, resulting in metal-on-metal clunking.
The GSW Phosphating Advantage:
GSW employs a rigorous phosphating process before the adhesive is applied. Phosphating is a chemical conversion coating that transforms the surface of the metal sleeve into a non-metallic, crystalline phosphate layer.
- Micro-Porous Structure: This crystalline layer creates a microscopically rough surface with millions of tiny pores.
- Mechanical Interlocking: When the adhesive is applied, it seeps into these micro-pores. Upon curing, the adhesive doesn’t just “stick” to the surface; it is physically locked into the crystal structure of the metal.
- Corrosion Resistance: The phosphate layer also acts as a barrier against rust, preventing under-film corrosion that often causes bond failure in salty environments.
Combined with our use of high-grade Natural Rubber (NR) blends designed for optimal Fatigue Life, this process ensures that the rubber will tear before the bond fails. This is the gold standard in the industry. For our partners, this technical detail is a powerful sales tool. You aren’t just selling a piece of rubber; you are selling a component that has undergone advanced chemical engineering to ensure it survives the harsh environment of the vehicle undercarriage. This attention to the "invisible" details—like phosphating—is what guarantees high CAE Analysis performance and real-world durability.
Conclusion
Replacing control arm bushings is a labor-intensive job where the cost of failure is high. By choosing parts that utilize advanced phosphating treatments and precise dimensional engineering, distributors and mechanics can ensure the repair lasts. Contact GSW Autoparts today to request our catalog and see how our bonding technology can reduce your warranty rates.
About the Author
Root is a Content & Operations Specialist at GSWAUTOPARTS with 5 years of industry experience. Leveraging his close proximity to our manufacturing floor, Root specializes in documenting product details and production processes. He focuses on translating technical insights about rubber and chassis parts into clear, helpful information for our customers.


