
How to replace upper control arm bushings?
Struggling with steering wander, clunking noises, or uneven tire wear that compromises vehicle stability? Neglecting worn upper control arm bushings can lead to dangerous handling and expensive suspension failure. This guide provides a professional roadmap for replacement.
To replace upper control arm bushings, you must secure the vehicle, remove the control arm, and use a hydraulic press or specialized removal tool to swap the old rubber for new units. Ensuring proper alignment and torquing fasteners at ride height is critical for restoring optimal NVH performance and vehicle safety.**

Understanding the nuances of bushing replacement is more than just a mechanical task; it involves understanding material science and suspension geometry to ensure a long-lasting repair.
What are Control Arm Bushes? How to Remove a Control Arm Bushing?
Control arm bushings act as the critical pivot points between the vehicle’s frame and the suspension components, dampening road vibrations. Removing them requires precision to avoid damaging the arm’s structural integrity or the mounting bores.
Control arm bushings are vibration isolators consisting of a rubber core bonded to inner and outer metal sleeves, designed to allow controlled movement. Removal typically involves using a C-clamp press or a hydraulic bench press to drive the old bushing out of its housing.

Dive Deeper Section:
From an engineering perspective, the control arm bushing is the "joint" of your vehicle’s chassis. At GSW, we treat the production of these components as a high-precision science. The core of a superior bushing lies in its Vulcanization process. This chemical reaction creates cross-links between polymer chains, which directly determines the material’s Shore Hardness A—the standard measure of rubber stiffness. For most passenger vehicles, we target a hardness between 60 and 70 Shore A to balance comfort with steering response.
When you begin the removal process, you are essentially fighting against decades of environmental bonding and friction. Professionals often use a "pull-and-push" method. If you are working in a B2B environment or a high-volume shop, the efficiency of this step depends on the quality of your tools. A common mistake is using a hammer and chisel; this can score the internal diameter of the control arm. If the bore is damaged, the new bushing will not have the required interference fit, leading to premature migration or "walking" of the bushing.
The physics involved here is significant. A bushing must handle high Tensile Strength loads during heavy braking or cornering. If the rubber is too soft, the steering geometry shifts under load, leading to "toe-out" and instability. If it is too hard, the NVH (Noise, Vibration, Harshness) levels become unbearable for the driver. Our GSW formula is specifically engineered to provide the high damping coefficients required to absorb high-frequency road noise while maintaining the structural rigidity needed for sharp handling. When removing a bushing, always inspect the "eye" of the control arm for ovality. If the hole is no longer perfectly round, no amount of high-quality rubber will fix the underlying suspension geometry issue.
Signs That You Need to Replace Bushings
Identifying bushing failure early is the key to preventing "collateral damage" to tires and other suspension components. Visual inspection and road testing are the primary diagnostic tools.
Common signs of failed bushings include audible clunking sounds over bumps, steering wheel vibration, and "memory steer" where the car pulls to one side. Visually, look for dry rot, tearing, or oil contamination on the rubber surfaces.

Dive Deeper Section:
Diagnosing a bushing isn’t just about looking for a "broken" part; it’s about understanding the Fatigue Life of the elastomer. Rubber is an organic compound that degrades over time due to heat cycles and ozone exposure. In a B2B context, explaining this to a client is vital: a bushing might look intact but have lost its "rate"—the amount of force required to deflect it. This is known as "softening," and it ruins the vehicle’s alignment under dynamic loads.
I recently watched a technical diagnostic video from 1A Auto, which provides a masterclass in identifying failing suspension components. The technician demonstrates how a pry bar can reveal excessive "play" in the upper control arm bushings—movement that is often invisible when the vehicle is stationary. This movement directly translates to the steering wander and vibration that GSW’s high-precision bushings are designed to eliminate through optimized Shore Hardness A and superior Vulcanization processes.
- Video Embed:

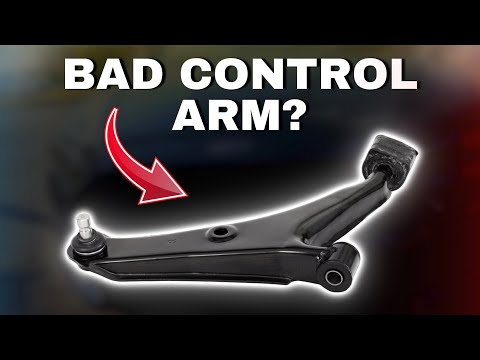
When explaining this to a car owner, I emphasize the "shopping cart effect." If the wheels aren’t held firmly by the bushings, they behave like the wobbly wheels on a broken shopping cart—vibrating and resisting your input. From a manufacturing standpoint, GSW uses CAE Analysis to simulate these stress points. We know exactly where a bushing is likely to tear first. That’s why our premium rubber formula includes anti-ozonants to fight the dry-rotting shown in the 1A Auto video. If a customer sees "alligator skin" cracking on the rubber surface, the Fatigue Life has been exceeded, and the part is no longer safe for high-speed travel. Safety isn’t just about the part not falling off; it’s about the part maintaining the geometry that keeps the tires in contact with the road.
Do I Need to Replace My Control Arm or Just the Bushings?
This is a critical decision point for both mechanics and fleet managers. The choice depends on labor costs, tool availability, and the condition of the ball joint.
If the control arm is structurally sound and the ball joint is replaceable or in good health, changing just the bushings is cost-effective. However, if the arm is bent or the ball joint is integrated and worn, replacing the entire assembly is safer and often faster.

Dive Deeper Section:
The "Bushings vs. Complete Arm" debate is ultimately a question of labor economics and total system reliability. In a factory environment, we use CAE Analysis to ensure that the entire control arm assembly reaches a synchronized end-of-life. If the bushings have reached their Fatigue Life, chances are the ball joint is not far behind.
For a mechanic, the labor required to press out old bushings, clean the bores, and press in new ones can sometimes exceed the cost of a pre-assembled GSW control arm. This is especially true for the upper control arm, which is often made of stamped steel or aluminum. Aluminum arms are particularly sensitive; if you press a bushing in at a slight angle, you can gall the aluminum or create a stress riser that leads to a catastrophic crack in the arm later. This is why many Tier-1 service centers prefer the assembly replacement—it eliminates the variable of human error during the pressing process.
Furthermore, a GSW complete control arm comes with factory-pressed bushings. This is important because factory pressing ensures the bushing is perfectly centered and pre-loaded according to the original equipment manufacturer’s (OEM) specifications. When you replace just the bushing, you must ensure the "clocking" or orientation is perfect. Many bushings have V-shaped voids designed to allow more movement in one direction (for comfort) and less in another (for handling). If you press them in 90 degrees off, you will ruin the vehicle’s NVH1 profile. When talking to car owners, explain that while the "part" might be cheaper, the "total job" with a complete arm often includes a new ball joint and a guarantee of factory-level precision, which provides much better long-term value.
How to Change Upper Control Arm Bushings?
The actual replacement process requires a systematic approach to ensure the suspension is not "pre-loaded" improperly, which is the number one cause of new bushing failure.
To change the bushings, remove the upper control arm from the vehicle, press out the old units, and press in new GSW bushings. Crucially, do not perform the final torque of the mounting bolts until the vehicle is back on the ground with its full weight on the suspension.

Dive Deeper Section:
The most technical aspect of changing upper control arm bushings is the concept of "clocking." Because the rubber is bonded to the inner and outer metal sleeves, it doesn’t "spin" like a bearing; it twists. This is why the Vulcanization quality is so important. If you tighten the bushing bolts while the car is up on a jack with the wheels hanging down, you have locked the bushing in a "droop" position. Once you lower the car, the rubber is immediately twisted significantly just to support the car’s weight. As soon as you hit a bump, the rubber is twisted beyond its Tensile Strength limits, causing it to tear within weeks. This is the most common reason for warranty claims in the aftermarket world.
A professional mechanic’s view is that the final tightening is the most important step of the 10-step process. You must use a drive-on lift or "pre-load" the suspension with a floor jack before reaching the final torque spec. From a safety perspective, an incorrectly installed bushing can snap or seize, leading to unpredictable steering snap-back.
At GSW, our technical support often reminds clients that the "Upper" arm handles less weight than the "Lower" arm but is more responsible for maintaining the Caster and Camber angles2 during braking. Therefore, any imperfection in the bushing—such as a lack of uniform Shore Hardness A across the batch—will be felt immediately by the driver as a vibration in the steering wheel. To explain this to a car owner: "Think of the bushing like a rubber band. If you twist it too far before you even start driving, it’s going to snap. We install them so they are ‘relaxed’ when the car is just sitting there, giving them the maximum room to move when you hit a pothole."
Conclusion
Replacing upper control arm bushings is a vital maintenance task that restores vehicle handling and safety. By choosing GSW’s premium rubber components, you ensure superior NVH control and extended Fatigue Life. Always prioritize precision during the press-in process and torque under load for the best results.
About the Author
Root is a Content & Operations Specialist at GSWAUTOPARTS with 5 years of industry experience. Leveraging his close proximity to our manufacturing floor, Root specializes in documenting product details and production processes. He focuses on translating technical insights about rubber and chassis parts into clear, helpful information for our customers.


